
Router Bits
9 Router Bit Mistakes That Are Ruining Your Cuts (And How to Fix Them)
9 Router Bit Mistakes That Are Ruining Your Cuts (And How to Fix Them)
Meta Title: 9 Router Bit Mistakes Ruining Your Cuts — And How to Fix Them
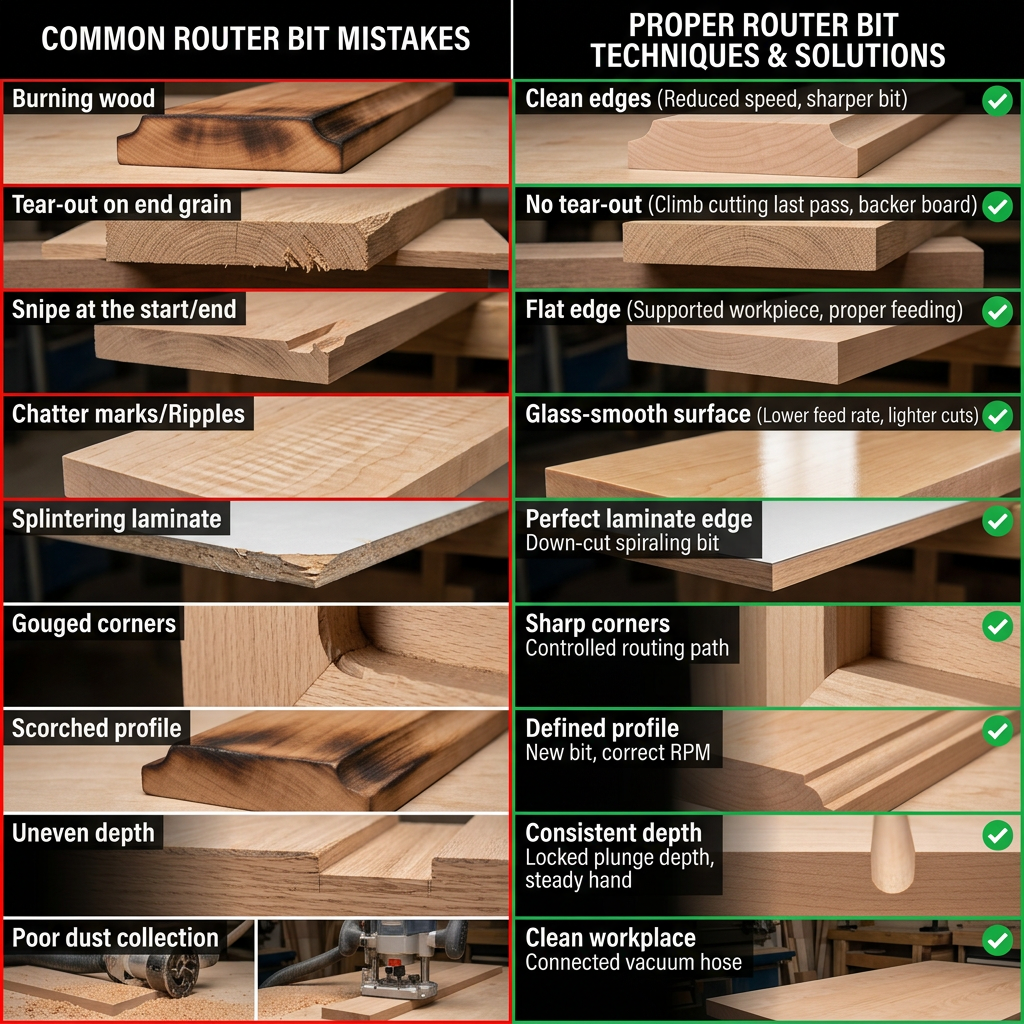
Meta Description: Burning, tear-out, kickback? These 9 common router bit mistakes are probably why. Learn the fix for each one before your next cut.
URL Slug: /blog/router-bit-mistakes-to-avoid
Target Keyword: router bit mistakes
Secondary Keywords: common router mistakes, router safety tips, router kickback
Search Volume: 3,600/mo
Word Count: 1,800–2,200
Schema: Article + FAQPage
AI Summary: The 9 most common router bit mistakes are: using 1/4" shank bits for heavy cuts, running large bits at full speed, making one deep pass instead of multiple shallow passes, cutting in the wrong direction, forcing dull bits, not cleaning resin buildup, using the wrong bit for the material, ignoring collet condition, and skipping test cuts. Each mistake is explained with the cause, the symptom, and the fix.
Mistake #1: Using 1/4" Shank Bits for Heavy Cuts
The Problem
A 1/4" shank has 1/4 the cross-sectional area of a 1/2" shank. Under heavy cutting loads, the 1/4" shank flexes. This flex shows up as:
- Chatter marks (regular ridges in the cut)
- Wavy profiles that aren't consistent along the edge
- Inconsistent depth of cut
- Increased vibration that fatigues your hands
The Fix
Use 1/2" shank bits for anything beyond light edge profiling. The rigidity difference is enormous — 4x more material resisting deflection.
1/4" shank bits are fine for:
- Trim routers with light-duty work
- Small roundovers on softwoods
- Cordless router operations
For hardwoods, deep cuts, or any profile over 3/8" radius, always use 1/2" shank. See our shank size comparison for the full technical breakdown.
Mistake #2: Running Large Bits at Full Speed
The Problem
Most routers default to 24,000+ RPM. A 2" diameter bit at that speed has an edge velocity of over 12,000 feet per minute. That's way too fast. It causes:
- Burn marks on every material
- Carbide overheating and premature dulling
- Increased vibration
- Risk of kickback if the bit grabs the material
The Fix
Match RPM to bit diameter. The general rule:
| Bit Diameter | Max RPM |
|---|---|
| Up to 1" | 24,000 |
| 1" to 2" | 18,000–22,000 |
| 2" to 2.5" | 14,000–18,000 |
| Over 2.5" | 10,000–14,000 |
If your router doesn't have variable speed, it's limited to small bits and light-duty work. For full-size routing, get a variable-speed router.
Our speed and feed rate guide has the complete chart by material and bit type.
Mistake #3: Making One Deep Pass
The Problem
Trying to rout a 3/4" deep groove in one pass is asking for trouble. The bit has to remove too much material at once, causing:
- Burning from excessive heat
- Vibration and chatter
- Bit deflection (the groove is wider at the top than the bottom)
- Increased kickback risk
- Premature carbide dulling
The Fix
Make multiple shallow passes — no more than 1/4" depth per pass for straight and spiral bits, no more than 1/8" for large profiles.
Example: A 3/4" deep groove = 3 passes at 1/4" each.
Each pass removes less material, generates less heat, and produces a cleaner cut. Yes, it takes longer. But you'll spend less time sanding burn marks out of your project.
The Exception
Some bits are designed for deep cuts — CNC surfacing bits and spoilboard bits can take deeper passes because they have large cutting surfaces and high chip clearance. But for standard woodworking profiles, keep passes shallow.
Mistake #4: Cutting in the Wrong Direction
The Problem
Feeding the router in the wrong direction (with the bit rotation instead of against it) causes the bit to grab the workpiece and pull it along — this is climb cutting, and it's dangerous when unplanned.
Symptoms of wrong-direction feeding:
- Bit pulls the router out of your hands (handheld)
- Workpiece launches off the router table
- Rough, torn surface finish
- Increased kickback risk
The Fix
Always feed against the bit rotation. This is called conventional cutting.
- Handheld router (outside edge): Move counterclockwise (left to right when facing the workpiece)
- Router table (outside edge): Feed from right to left
- Handheld router (inside edge, like a frame): Move clockwise
- Router table (inside edge): Feed from left to right
When the router feeds against rotation, the bit pushes the workpiece into the fence or guide — keeping it controlled.
When Climb Cutting Is OK
Experienced woodworkers sometimes use intentional climb cutting as a final pass to eliminate tear-out on figured grain. This is a finishing technique — take a very shallow cut (1/32") and hold firmly. Never climb cut on the primary pass.
Mistake #5: Forcing Dull Bits
The Problem
A dull bit doesn't cut — it rubs. Rubbing generates heat, which burns the wood, damages the carbide, and can scorch the workpiece beyond repair.
Signs your bit is dull:
- Cuts require noticeably more force
- Burn marks appear on previously clean cuts
- Surface finish is rough or fuzzy
- Sawdust is dark brown (instead of light tan)
- Bit feels hot after cutting
The Fix
Sharpen or replace dull bits immediately. Don't push through "just one more project."
When to sharpen:
- After 15–20 hours of cutting time
- When burn marks appear
- When cut quality degrades
When to replace:
- Carbide tip is chipped, cracked, or missing
- Bit has been sharpened 5+ times
- Shank is bent or damaged
For the complete sharpening guide, see how to clean, maintain, and sharpen router bits.
Mistake #6: Not Cleaning Resin Buildup
The Problem
Resin and pitch accumulate on carbide tips during use, especially in softwoods and exotics. The buildup:
- Increases friction and heat
- Reduces cutting efficiency
- Causes burning even on sharp bits
- Makes the bit feel dull when it's actually just dirty
The Fix
Clean your bits after every 2–3 hours of use, or whenever you notice resin buildup.
Cleaning method:
- Spray with commercial bit cleaner (CMT, Boeshield, Trend) or Simple Green
- Let it soak for 5–10 minutes
- Scrub with a brass wire brush (never steel — it scratches carbide)
- Rinse with clean water and dry immediately
Avoid:
- Steel brushes — they can damage carbide edges
- Abrasive pads — same problem
- Soaking in harsh solvents overnight — can damage the bearing
Our maintenance guide covers the full cleaning routine.
Mistake #7: Wrong Bit for the Material
The Problem
Using the wrong bit type for your material causes chipping, burning, and poor cut quality — even with a perfectly sharp bit.
Common material/bit mismatches:
| Material | Wrong Bit | Right Bit |
|---|---|---|
| Melamine | Straight bit (chips surface) | TCG or compression spiral |
| Plywood veneer | Upcut spiral (tears top face) | Compression spiral or downcut |
| MDF | Standard carbide (dulls fast) | Higher grade carbide, coated |
| Hard end grain | Standard straight bit | Spiral upcut |
| Plastics | Multi-flute wood bit (melts) | O-flute plastic bit |
The Fix
Match the bit to the material before you start. Our how to choose guide has a complete material-to-bit matching chart.
If you're unsure, test on scrap first (see Mistake #9).
Mistake #8: Ignoring Collet Condition
The Problem
The collet grips the bit shank and transfers all cutting forces. A worn, dirty, or damaged collet causes:
- Bit slippage — the bit slowly drops deeper into the cut
- Runout — the bit doesn't spin true, producing wavy cuts
- Uneven cutting — one side of the bit cuts deeper than the other
- Bit ejection — in extreme cases, the bit flies out during use
The Fix
- Clean the collet every time you change bits (compressed air)
- Inspect for wear — look for scoring, deformation, or cracks
- Replace the collet every 2–3 years with regular use, or whenever you notice runout
- Tighten properly — firm but not extreme. Overtightening deforms the collet
- Never use a damaged collet — it's a safety hazard
A new collet costs $15–$30. A new workpiece (or trip to the ER) costs more.
Mistake #9: Skipping Test Cuts
The Problem
Cutting directly into your project piece without testing is gambling. You don't know:
- If the speed is correct
- If the feed rate is right
- If the bit depth is accurate
- If the material will tear out
- If your setup has any alignment issues
One wrong cut on a finished panel can mean starting over.
The Fix
Always test on scrap first. Use a piece of the same material as your project.
Test checklist:
- Set RPM according to the speed chart
- Cut a 6" test piece
- Check for:
- Burn marks (speed too slow, feed too slow, or bit dull)
- Tear-out (wrong direction, wrong bit type, or wrong grain orientation)
- Chatter/vibration (wrong shank size, worn collet, or wrong RPM)
- Profile depth (bearing size, depth setting)
- Adjust settings
- Cut another test piece
- Only proceed to the project when the test cut is clean
This takes 5 minutes and saves hours of fixing mistakes.
Quick Reference: Mistake → Fix
| # | Mistake | Quick Fix |
|---|---|---|
| 1 | 1/4" shank for heavy cuts | Use 1/2" shank |
| 2 | Full speed on large bits | Match RPM to diameter |
| 3 | One deep pass | Max 1/4" depth per pass |
| 4 | Wrong feed direction | Feed against bit rotation |
| 5 | Forcing dull bits | Sharpen or replace |
| 6 | Resin buildup | Clean with brass brush |
| 7 | Wrong bit for material | Match bit type to material |
| 8 | Worn collet | Clean, inspect, replace |
| 9 | No test cuts | Always test on scrap |
Frequently Asked Questions
Q: What causes burn marks when routing?
A: Three things — RPM too high for the bit diameter, feed rate too slow, or a dull bit. Check all three. Start by reducing RPM, then try feeding faster. If burning continues, the bit needs sharpening.
Q: How do I prevent tear-out on figured wood?
A: Use a sharp spiral bit (downcut or compression), take shallow passes, and use climb cutting as a final shallow pass. Reduce RPM by 10–15% for figured species. See our straight vs spiral guide.
Q: Why does my router vibrate so much?
A: Check three things: (1) Is the bit shank bent? Replace it. (2) Is the collet worn? Replace it. (3) Are you using a 1/4" shank in a heavy cut? Switch to 1/2". See our shank size guide.
Q: How often should I clean my router bits?
A: Every 2–3 hours of use, or whenever you notice resin buildup. Softwoods and exotics accumulate resin faster than hardwoods. Clean with commercial bit cleaner and a brass brush.
Q: Can I use the same bit for hardwoods and softwoods?
A: Yes, but adjust your speed and feed rate. Hardwoods need slower RPM and moderate feed rate. Softwoods can handle faster RPM and faster feed rate. Use higher-grade carbide for hardwoods — standard carbide dulls faster on dense species.