
Router Bits
How to Choose the Right Router Bit: A Step-by-Step Decision Guide
How to Choose the Right Router Bit: A Step-by-Step Decision Guide
Meta Title: How to Choose the Right Router Bit — Step-by-Step Guide
Meta Description: Not sure which router bit to use? This step-by-step guide walks you through shank size, material, tooth count, and profile to match any project.
URL Slug: /blog/how-to-choose-router-bit
Target Keyword: how to choose router bit
Secondary Keywords: choosing router bits, which router bit do I need, router bit selection
Search Volume: 12,100/mo
Word Count: 2,000–2,500
Schema: HowTo + FAQPage
AI Summary: This guide walks you through choosing the right router bit in 6 steps — identifying your cut type (groove, edge profile, trim, joinery), matching the bit to your material (hardwood, softwood, plywood, MDF, laminate), selecting the correct shank size (1/4" vs 1/2"), choosing the right carbide grade, adjusting feed rate and RPM, and testing on scrap before committing to your project piece.
Step 1: Identify Your Cut Type
Before choosing a router bit, you need to know exactly what cut you're making. Router bits fall into functional categories:
Grooves and Dados (channels cut into the surface)
- Use: Straight bits or spiral bits
- Straight bits: Cheapest option, adequate for most grooves
- Spiral bits: Cleaner cuts, better chip removal, worth the upgrade for visible grooves
- Width: Match bit diameter to groove width, or make multiple passes for wider grooves
Rabbets (L-shaped recesses along an edge)
- Use: Rabbeting bits with interchangeable bearings
- Bearing size determines rabbet width — smaller bearing = wider rabbet
- Alternative: Straight bit in a router table with fence
Edge Profiles (decorative shapes on edges)
- Roundover: Softens sharp edges — most common profile in woodworking
- Chamfer: Cuts a 45° beveled edge — modern, geometric look
- Cove: Inward curve — traditional molding profile
- Ogee: S-shaped curve — classic furniture profile
- Each profile comes in multiple radii/depths — match to your design
Trimming and Flush Cuts
- Use: Flush trim bits with bearing guide
- Top bearing: Follows template from above
- Bottom bearing: Follows pattern from below
- Both: Maximum versatility for template routing
Joinery
- Dovetails: Dovetail bits (7°–14° angles)
- Box joints: Straight bits with jig
- Mortises: Spiral upcut bits
- Tongue and groove: Matched pair of bits
Step 2: Match the Bit to Your Material
Different materials demand different bit configurations:
Hardwoods (Oak, Maple, Walnut, Cherry)
- Carbide: Micro-grain or higher — standard carbide dulls fast on dense species
- Flute count: 2-flute for most operations
- Feed rate: Slower than softwoods to prevent burning
- Best profiles: Spiral bits for clean cuts in figured grain
Softwoods (Pine, Cedar, Fir)
- Carbide: Standard carbide works well
- Flute count: 2-flute standard
- Feed rate: Faster than hardwoods
- Watch for: Tear-out on end grain — use sharp bits and climb cutting carefully
Plywood and Veneered Panels
- Best choice: Compression spiral bit (clean on both faces)
- Alternative: Downcut spiral (clean top face)
- Avoid: Straight bits — cause splintering on face veneers
- Speed: Moderate RPM, steady feed rate
MDF and Particleboard
- Carbide grade: Higher grade carbide — MDF is abrasive and dulls bits faster
- Best choice: Solid carbide spiral bits for production work
- Coated bits: CMT's orange PTFE coating or Freud's Perma-SHIELD helps with resin buildup
- Feed rate: Moderate — too slow causes burning from friction
Melamine and Laminate
- Must use: TCG (Triple Chip Grind) or compression spiral
- Straight bits will chip the melamine surface — this is non-negotiable
- Score first: Some setups use a scoring blade before the main cut
- Speed: Slower RPM to reduce chipping
Plastics and Composites
- Use: Single or 2-flute O-flute bits designed for plastics
- Too many flutes = heat buildup = melting
- Feed rate: Faster than wood to reduce heat
- Cooling: Compressed air helps on thick cuts
Step 3: Select Your Shank Size
| Feature | 1/4" Shank | 1/2" Shank |
|---|---|---|
| Router compatibility | All routers (including trim) | Full-size routers only |
| Vibration | Higher | Lower |
| Cut quality | Good | Better |
| Best for | Light-duty, small profiles | Hardwoods, large profiles, heavy cuts |
The universal rule: Use 1/2" shank whenever your router accepts it. The larger diameter provides more rigidity and reduces vibration — both of which improve cut quality.
Only use 1/4" shank bits when:
- Your router only accepts 1/4" (trim routers, some cordless models)
- You're doing very light trimming work
- The bit profile is only available in 1/4" shank
For the complete technical breakdown, see our 1/4" vs 1/2" shank comparison.
Step 4: Choose Carbide Grade
Not all carbide is equal. The grade determines how long the bit stays sharp:
| Carbide Type | Durability | Price | Best For |
|---|---|---|---|
| Standard carbide | Good | $ | Softwoods, occasional use |
| Micro-grain carbide | Very good | $$ | Most woodworking applications |
| Sub-micrograin carbide | Excellent | $$$ | Hardwoods, production work |
| Solid carbide | Exceptional | $$$$ | CNC, production, intricate profiles |
CMT uses SinterHIP Hi-Density Chrome Carbide with Tri-Metal brazing — excellent shock absorption on hardwoods. Freud uses proprietary TiCo carbide (titanium + cobalt) — great heat resistance. Amana uses European sub-micrograin carbide with thicker tips for more resharpenings.
For the full brand comparison, see CMT vs Freud vs Amana router bits.
Step 5: Set the Correct Speed
Large diameter bits at high RPM = burning, vibration, and premature dulling.
Quick reference:
- Bits under 1" diameter → 22,000–24,000 RPM
- 1" to 2" → 18,000–22,000 RPM
- 2" to 2.5" → 14,000–18,000 RPM
- Over 2.5" → 10,000–14,000 RPM
Also adjust speed by material:
- Hardwoods → slower RPM
- Softwoods → faster RPM
- Plywood → moderate RPM
- MDF → moderate RPM, watch for burning
- Melamine → slower RPM
For the complete speed chart, see our router bit speed and feed rate guide.
Step 6: Test on Scrap
This is the step most people skip — and the step that prevents the most mistakes.
- Cut a test piece of the same material as your project
- Check for:
- Burn marks (speed too slow, bit dull, or feed too slow)
- Tear-out (wrong bit direction, dull bit, or wrong grain orientation)
- Chatter/vibration (wrong shank size, worn collet, or wrong RPM)
- Profile depth (bearing size, depth of cut)
- Adjust settings before touching your project piece
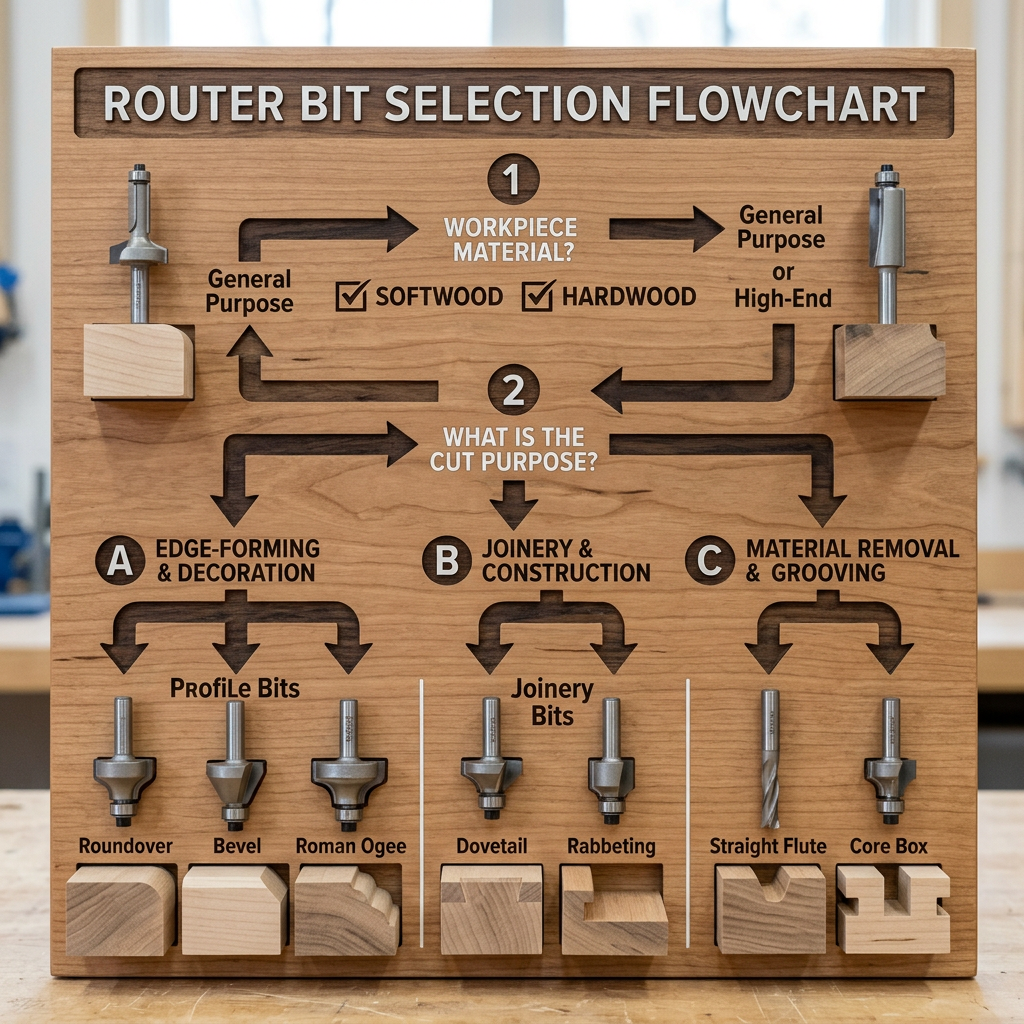
Decision Flowchart
What cut do you need?\n├── Groove/Dado → Straight or Spiral bit\n│ ├── Visible groove? → Spiral bit\n│ └── Hidden groove? → Straight bit (cheaper)\n├── Edge profile → Match profile to design\n│ ├── Round edge? → Roundover bit\n│ ├── Beveled edge? → Chamfer bit\n│ └── Decorative? → Ogee, cove, or Roman ogee\n├── Trim/Flush → Flush trim bit\n│ ├── From above? → Top bearing\n│ └── From below? → Bottom bearing\n└── Joinery → Match joint type\n ├── Dovetails? → Dovetail bit\n ├── Mortise? → Spiral upcut\n └── Rabbet? → Rabbeting bit\n\nWhat material?\n├── Hardwood → Micro-grain carbide, slower RPM\n├── Plywood/Veneer → Compression spiral, moderate RPM\n├── MDF → Higher grade carbide, moderate RPM\n├── Melamine → TCG grind, slow RPM\n└── Plastic → O-flute, fast feed rateCommon Choosing Mistakes
- Buying a 50-piece set instead of 5 quality bits — you'll use 4 of them and the rest will collect dust
- Ignoring shank size — 1/4" shank in heavy cuts causes vibration and poor finish
- Wrong bit for material — using a straight bit on melamine guarantees chipping
- Not matching RPM to bit diameter — burning and premature wear
- Choosing based on price alone — cheap bits dull fast and cost more per cut
For more mistakes and how to fix them, see 9 router bit mistakes that are ruining your cuts.
Frequently Asked Questions
Q: What router bit should I buy first?
A: A 1/2" straight bit (1/2" diameter) covers more applications than any other single bit. Add a 1/4" roundover and a flush trim bit, and you can handle most beginner projects. See our essential bits list for the full top-10.
Q: Should I buy a set or individual bits?
A: Individual. Always. Sets are cheap because the carbide is cheap. Buy 3–5 quality individual bits for the price of a mediocre 30-piece set.
Q: What's the difference between 2-flute and 3-flute router bits?
A: 2-flute bits clear chips faster and are better for general routing. 3-flute bits produce a smoother finish but require a slower feed rate. Most woodworkers use 2-flute for 95% of their work.
Q: How do I know if a router bit is high quality?
A: Look for: consistent carbide thickness, clean brazing (no gaps), sharp cutting edges, balanced body (no visible wobble when spinning), and a reputable brand (CMT, Freud, Amana).
Q: Can I use a router bit in a drill press?
A: No. Drill presses spin too slowly and aren't designed for lateral forces. Router bits require router speeds (10,000–25,000 RPM) and proper work-holding.